RED SHADOW
The Cast
Figure Conversions
The page includes some instruction
images so may take a while to load.
|
 |
 The
Red Shadow's Guide Figure Conversion. The
Red Shadow's Guide Figure Conversion.
This is a conversion of some Old Glory French Marines.
These are from their Boxer Rebellion line. I wanted to
have a machine gun group and OG doesn't produce one for this range. I use
my Colonial Marines for Africa so they appear in white uniforms, rather
than the far east khaki. |
The Shadow's Axiom :
"Terrain and figures you
create will always look better to others that they do to you"
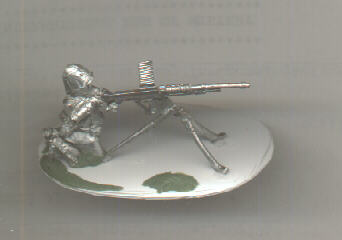
Two sets were made, a deployed Hotchkis MG group and another
with the unit on the move. The 1898 Hotchkis comes with Old Glory's "Sons
of the Desert" range. In that range's French MG bag comes several Hotchkis
MG's, a few too many for your average FFL game (unless you're into a one
sided slaughter). Two of the MG's are used, one is assembled deployed and
the other used for the moving unit. |
 The
moving unit is the easiest of the two. The gun piece has its magazine clip
neatly detached from its receiver and saved later for the deployed group.
To remove it I neatly chopped it with a new xacto blade. The figure (far
left) is an advancing figure with his Lebel at high port. The gun was snipped
off with flush cutting side cutters. The hands were then drilled out with
a fine bit (available from model stores) held in an xacto hand chuck.
After the hands are drilled out it's an easy jog to snip out the remainder
of the rifle with the side cutter. The hands are then trimmed to the fingers
with the point of a number 11 xacto blade. This fairly quickly blunts them
so have a few replacements handy. The MG is then simply glued in place. The
moving unit is the easiest of the two. The gun piece has its magazine clip
neatly detached from its receiver and saved later for the deployed group.
To remove it I neatly chopped it with a new xacto blade. The figure (far
left) is an advancing figure with his Lebel at high port. The gun was snipped
off with flush cutting side cutters. The hands were then drilled out with
a fine bit (available from model stores) held in an xacto hand chuck.
After the hands are drilled out it's an easy jog to snip out the remainder
of the rifle with the side cutter. The hands are then trimmed to the fingers
with the point of a number 11 xacto blade. This fairly quickly blunts them
so have a few replacements handy. The MG is then simply glued in place.
For the tripod man, I used a marching figure who originally
had the rifle leant back over his shoulder. It was cut out in a similar
way. The tripod was simply assembled and the legs just bent at their hinge
point until they were all in line as if collapsed. The collapsed tripod
was then laid on the figures shoulder in place of his removed Lebel. A
little arm bending was accomplished using pointed nose pliers. Be sure
and use the sort without the serrated jaws. They're available from craft
stores, usually in the bead section. |
 Making
the kneeling figures was a little more involved. Making
the kneeling figures was a little more involved.
This was the figure that became the MG operator. Using
the techniques as described above for the rifle removal, the gun was cut
out. It's a little more difficult when the gun is in the shoulder
as you have to cut back into some chunky metal.
Little bits were cut at a time rather than hacking out
big lumps. The little blighter was then chopped off at the knees. Using
flush cutting side cutters the flat edge was kept on the thigh stumps rather
than the shin stumps. |
 The
base also needed to be cut away from the feet. Snipping all around them
they were then flush cut around the feet, snipped down to the soles and
the soles filed for a flat finish. The
base also needed to be cut away from the feet. Snipping all around them
they were then flush cut around the feet, snipped down to the soles and
the soles filed for a flat finish.
Using super glue, the shin stumps were attached to the
back of the thighs, I didn't worry about trying to make it stand
up (or rather kneel up) at this point. I tried to make it look anatomical
and imagined the missing bits were there.
After it dried, I mixed up some epoxy putty. I use
the sort that comes from the hardware store in the ribbon. A blue
and yellow strip that when mixed thoroughly turns green. Then the
gaps were filled, where the knee should be, with the putty |
 It
was important that the application tool was wet while doing this, otherwise
the putty sticks to it. I used my all purpose number 11 xacto blade to
accomplish this. I used the edge of the point to indent the knee area to
introduce creases in the pants in the same manner as the original figures
sculpted creases. The finished figure was pushed gently onto the base and
allowed to set. It
was important that the application tool was wet while doing this, otherwise
the putty sticks to it. I used my all purpose number 11 xacto blade to
accomplish this. I used the edge of the point to indent the knee area to
introduce creases in the pants in the same manner as the original figures
sculpted creases. The finished figure was pushed gently onto the base and
allowed to set.
Using the method described above the arms were bent, gently,
as necessary to appear to be gripping the appropriate parts of the
gun. The right hand is at the rear where the trigger is, and the
left is bent around as if holding the rear side of the receiver. |
 The
second figure was made in much the same way, except he is given the magazine
clip (the one clipped off earlier for the moving group.) The
second figure was made in much the same way, except he is given the magazine
clip (the one clipped off earlier for the moving group.)
This is being held up to the mouth as the number 2 blows
off the sand before feeding it into the receiver. |
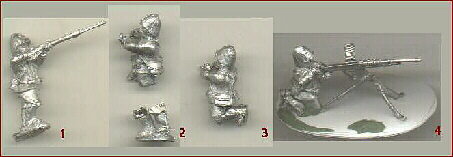
All 4 stages are shown below together.
 |
| A similar conversion can be seen here done for the French
Foreign Legion. This uses a 4 man team, the tripod has been split between
two carriers. Two of the team are carrying extra ammo boxes and have quickly
accessible magazine clips stacked on their packs. The ammo boxes and extras
clips are made from Sculpy. Sculpy is a modeling PVC plastic that
has the constituency of clay. It hardens by being baked in the oven for
15 minutes at 275°F. As this is below the melting point of Lead/Tin
alloys it can be baked while attached to the figure. |
|
|
German 7.7 cm Field Gun
|
|
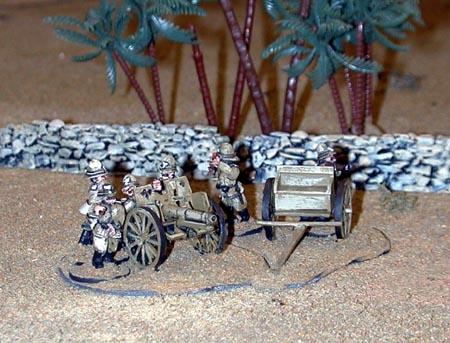
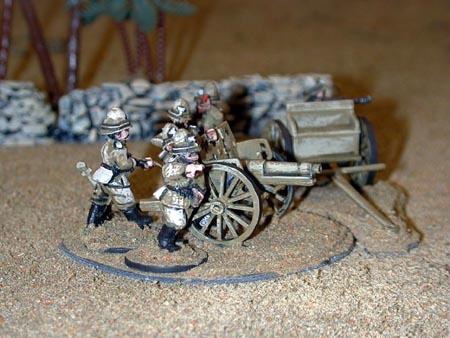
| This beautiful model of a 77 mm
field gun is from Riveresco. It is available with 25 mm crew in Pickelhaubers.
John McEwan, the owner and designer if Riveresco had mentioned that he
intended to make a crew team in sun helmets. As this is a 25 mm model,
and my figures are the slightly lager 28 mm figures, I wanted to modify
a few and see how they fit in with the gun. I was please with the result,
as the gun does not at all look out of scale. The best modified figure
is unfortunately no very viewable from the photos, but is a seated figure
actually sat on the crew seat behind the splinter shield. Two crew
handling shell's, one pulling a lanyard, one seated, the officer pointing,
(this was just an arm removal and re graft as the original was pointing
in the sky) and one more figure left as was, firing over the caisson. The
crew are modified fro German Marines from Old Glory Boxer Rebellion line.
Another image of this model can be seen on the German Cast page. |
|
|
|
Arab/Berber Machine Gunners
Wanting a Berber machine gun
team with captured MG, I took a Great War German machine gun team. Trimmed
down their helmet and kit, and re-wrapped them in putty, carving in plenty
of creases.
The original model can be seen
on the German Cast page
|
 These
two conversions are a little less obvious, but subtly pleasing. The wounded
legionnaire started out as a falling wounded figure, falling backwards
clutching his chest. The figure was pushed into a bed of Sculpy, his rifle
cut out of his hand and laid at his side. The whole thing was then baked.
The lying wounded figure fits in better for me. These
two conversions are a little less obvious, but subtly pleasing. The wounded
legionnaire started out as a falling wounded figure, falling backwards
clutching his chest. The figure was pushed into a bed of Sculpy, his rifle
cut out of his hand and laid at his side. The whole thing was then baked.
The lying wounded figure fits in better for me. |
 The
camel is a Ancients Pack Camel from Irregular miniatures I think. It is
actually a bactrian camel, but there is so much stuff pled on his back
you would never know there are two humps there instead of one. Much of
the ancients looking stuff, shields, arrows etc. has been cut away. A few
cases and boxes added (from Dixons stage coach luggage). This gives it
a more modern appearance. The extra straps were just made from green putty. The
camel is a Ancients Pack Camel from Irregular miniatures I think. It is
actually a bactrian camel, but there is so much stuff pled on his back
you would never know there are two humps there instead of one. Much of
the ancients looking stuff, shields, arrows etc. has been cut away. A few
cases and boxes added (from Dixons stage coach luggage). This gives it
a more modern appearance. The extra straps were just made from green putty. |
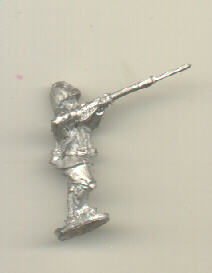
If you want to start out with an easy conversion, the
flag bearer at the top of the page is made from an advancing figure. The
rifle was cut out of his ands. This was replaced with a brass wire rod.
A rifle was cut from a spare figure and glued to his back. The flag, of
course, is from the
warflag section. |
|
|
The
majority of the images displayed in the "cast" section were taken on a
Nikon
Coolpix 900 Digital Camera.
Some
of the then were scanned on a flatbed scanner by laying the figure directly
on the glass.
In
order to make the page load times reasonable, some images have been reduced
for this page, the full size image can be accessed by selecting the image.
To return to this page, use the "back" button of your browser.
|
|

